Here's the second (and final) installment of my progress on the FlowerFace "game head".
-----
 Here we have a photo of the blank eyes that I got on glasseyes.com. I ordered the goat-looking ones.
-----

 So now I'm going to start painting them. This picture is of the general first coat of color I put on. The next one shows how I carved out some of the dry paint (sgraffito if you want to use the artsy term) so it was transparent, and then painted it with a different color.
-----
 This is a photo of one of the eyes with the glass eye installed. I added Super Sculpey around it to form the eyelids and tear duct and used the hair dryer again to dry it. You can also see the finished glass eye in this photo.
-----
 After this, I brought it outside and sanded everything down. Everything meaning everything made out of the foam material- the main body. I didn't include a picture because you can't really tell the difference. The photo here is when I had added the first layer of white paint. I had bought a small tub of titanium white for something else and never used it, so I decided it'd be good for this project.
-----
 One of the issues I had with this, which drove me nuts, was all the bubbles that started showing up. I even took a picture of all the bubbles. I guess that's what happens with foam. So, I added another layer of paint. And another. And another. I did a lot of this while watching TV or listening to music. In this picture you can also see the texture of the 'fur' like pattern I was going for... Instead of using faux fur that was really short, I thought I'd paint it instead to acheive the effect of it having short fur.
-----
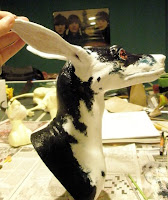
 After letting the white layers dry, I went in and added the darker markings. This is when I "sketched" out where the markings would be. The other colors to blend them are added later.
-----


 The first photo shows once I started adding the brownish/dark yellow color around the darker markings. A few more layers need to be added to blend it a little more. The middle photo is once I added the first brown layer, and the last photo is when I started blending it in more with the darker color.
-----
 A photo of the ear once I had painted it.
-----
 This picture shows the (unfinished) painting around the eye. Many animals have a lighter color around the eye, so I wanted to represent that on this sculpture.
-----
 Just to give you an idea of what the rest looked like at this point- this photo shows the markings under the neck/chin and the finished "blending" of the marking colors.
-----
 Now I'm ready to glue on the flowers. I bought some fake sunflowers at Hobby Lobby and dissected them. I glued 2 petals together for each petal around the eyes.
-----
 After finishing the actual body, I have to attach it to a plaque. I don't remember the website I ordered this from, but it's the same company that sells stuff at basically every craft store. They probably cut down the rainforest for it. Anyway, I Gorilla Glued it and propped it up with stuff (the ears are the heaviest part) and let it sit for 2 hours.
-----


 All finished! Here are some different views and close-ups. This will eventually be in my room, which is being re-done.
omg! why didnt i see this sooner! @W@ flowerface iiiis sooo adorable! :) the details, omg the eyes so awesome~
ReplyDeletei showed my friend, and she says it's beatiful @W@ nice job! keep it up!
ps by the way it's lisa~