Tuesday, August 25, 2009

boris


"boris"


Much of my time over the last month has been occupied by a little game called Fallout 3. Yes, I know I'm a year late.

Anyway, I watched my brother play this game, and I tried it and decided to start my own game. I didn't want to make my character look like me, because that's boring. So I made the creepiest person I could. Enter boris. I forgot to capitalize his name when I first made him, so I just leave it lowercase.

I dragged all the bars to adjust the facial features either all the way to the left or all the way to the right, so I could make the most ridiculous looking person possible. For example, making the eyes huge and spacing them apart way too much. And giving him a mustache. And making him balding. And giving him angry eyebrows. And a "Shady Hat". He's also a cannibal, but Charon and Dogmeat don't judge him for it.

In the game he has square-ish glasses, since I can't seem to find old man rapist glasses anywhere in the Capital Wasteland. But that's where I used my art skill to change something.

Anyway, I don't know if I made it "creepy" enough, although I might introduce him regularly into my paintings, he's weird looking, which is good from a drawing perspective.

Note- the photos are a bit too light on the edges, since it was really bright in the room I took them.

Friday, August 21, 2009

Some Olds

A few older artworks that I thought I'd post, since I haven't had access to a scanner lately and haven't posted anything in a while. I am working on new artwork, but at the moment my scanner/printer is in a corner somewhere since I just re-painted and re-arranged my room. So here...


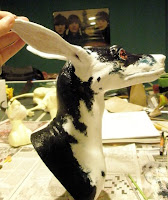
I'm also working on another "head" sculpture similar to the others I have posted, although I've hit a lazy streak lately and am distracted by Fallout 3 and working on other paintings.

Thursday, July 16, 2009

A Jackalope

Something I finished today. I had started this a few weeks ago, but was busy on the FlowerFace one so I didn't work on it much. A neon pink Jackalope. Made with: Foam rabbit wall mount, faux fur, wire, painted glass eyes, fluorescent pink paint pen, scissors, and a glue gun. To get an idea of the process, see the "Neon Orange Rabbit" post from earlier.

-----


Wednesday, July 15, 2009

Childhood Drawings

Recently I've been cleaning out my room, aiming to rearrange it and get rid of a lot of stuff. I got rid of every sketchbook I've ever kept that dated earlier than 2005-ish. I'm very unsentimental about all of it, because it really doesn't matter, so I might as well recycle them. Anyway, I found a few interesting things in the process. From a folder of really old stuff I drew... I don't know the exact dates, since I didn't start putting dates on my artwork until I was about 13. But they're obviously from when I was under 10 years old, most likely around 5 or 6. So, here are a select few.

-----


This set of 3 drawings has got to be my favorite find. I find these childhood drawings hilarious, I don't know why. They were in a notebook that was zebra head-shaped (seriously!) and they were annoying to scan. I haven't recycled these yet. I kind of like them. I don't know what I'd do with them, though.


-----


These drawings are of something that I called a "Youmpa". They look similar to Chuppy- probably from the same time period. The one that doesn't say "Baby Youmpa" was actually a cutout that was drawn on both sides. I used to make a lot of cutout creatures like that. The folder said "PUPPETS".


-----


This explains itself. Good thinking, bird-thing!


-----


This drawing is of a cockatiel that I had, named Polly. It's obviously her going to space, what bird doesn't do that? (PS there is a drawing on the other side, of the same thing, you can see through it a little.)


-----


This picture, unlike the others, is from around 2005. An early development of a creature I now draw quite often. It was a doodle on one of my Spanish class assignments or notes... I don't know what it says anymore, my brain has deleted all of that knowledge (not like I ever actually learned Spanish in that class).

Thursday, July 9, 2009

FlowerFace WIP (Part 2)


Here's the second (and final) installment of my progress on the FlowerFace "game head".


-----

Here we have a photo of the blank eyes that I got on glasseyes.com. I ordered the goat-looking ones.


-----

So now I'm going to start painting them. This picture is of the general first coat of color I put on. The next one shows how I carved out some of the dry paint (sgraffito if you want to use the artsy term) so it was transparent, and then painted it with a different color.


-----

This is a photo of one of the eyes with the glass eye installed. I added Super Sculpey around it to form the eyelids and tear duct and used the hair dryer again to dry it. You can also see the finished glass eye in this photo.


-----

After this, I brought it outside and sanded everything down. Everything meaning everything made out of the foam material- the main body. I didn't include a picture because you can't really tell the difference. The photo here is when I had added the first layer of white paint. I had bought a small tub of titanium white for something else and never used it, so I decided it'd be good for this project.


-----

One of the issues I had with this, which drove me nuts, was all the bubbles that started showing up. I even took a picture of all the bubbles. I guess that's what happens with foam. So, I added another layer of paint. And another. And another. I did a lot of this while watching TV or listening to music. In this picture you can also see the texture of the 'fur' like pattern I was going for... Instead of using faux fur that was really short, I thought I'd paint it instead to acheive the effect of it having short fur.


-----

After letting the white layers dry, I went in and added the darker markings. This is when I "sketched" out where the markings would be. The other colors to blend them are added later.


-----

The first photo shows once I started adding the brownish/dark yellow color around the darker markings. A few more layers need to be added to blend it a little more. The middle photo is once I added the first brown layer, and the last photo is when I started blending it in more with the darker color.


-----

A photo of the ear once I had painted it.


-----

This picture shows the (unfinished) painting around the eye. Many animals have a lighter color around the eye, so I wanted to represent that on this sculpture.


-----

Just to give you an idea of what the rest looked like at this point- this photo shows the markings under the neck/chin and the finished "blending" of the marking colors.


-----

Now I'm ready to glue on the flowers. I bought some fake sunflowers at Hobby Lobby and dissected them. I glued 2 petals together for each petal around the eyes.


-----

After finishing the actual body, I have to attach it to a plaque. I don't remember the website I ordered this from, but it's the same company that sells stuff at basically every craft store. They probably cut down the rainforest for it. Anyway, I Gorilla Glued it and propped it up with stuff (the ears are the heaviest part) and let it sit for 2 hours.


-----

All finished! Here are some different views and close-ups. This will eventually be in my room, which is being re-done.


Sunday, June 28, 2009

Orange Rabbit


This is another project along the lines of the FlowerFace one (previous post). After ordering a rabbit form at the same time as the coyote one used for my other project, I got the idea to do a neon colored rabbit. Here's how I did it.


-----

First we have the rabbit form and the plaque. The plaque is a size 9x12. The form is for a jackrabbit- a little bit bigger than a normal rabbit. That piece of (faux) fur next to it was to test out and see if painting it with acrylic paint would work. It didn't- it ended up looking wet and spiky.


-----

Next we have to attach the fur. We have a huge box of white faux fur from when my brother made his girlfriend a teddy bear (really!). Apparently he bought way too much. Anyway, I got thinking about how to color it, since I wanted a neon rabbit. After trying paint and spraypaint, which didn't work very well, I settled on a neon orange paint pen. It works amazingly. So what I did was hot glue the fur on, and after gluing it, trimmed it, and then painted it. The progress shown in this picture took about an hour, since it was completed while watching Conan O'Brien.


-----

After attaching some of the fur I made the ears. I just used Super Sculpey, wire, and a little wire mesh. In retrospect I probably could have just used a wire outline and attached the fur around that. This picture is me testing out the position of the ears without gluing them down yet, since I still had to glue the fur on. Also, that wire going across the ear needed to be clipped off later. Woops.


-----

It helps to draw lines on the rabbit and then cut the fur into the correct shapes. That way, you can put it together like a puzzle. This picture also shows the eyes. I bought a lot of 100 blank glass eyes on eBay. I needed to carve away a little bit of the foam around the eyes, since the glass eyes were a tad bigger. For this I used a sharp hook shaped tool for ceramics. I just painted the back of the eyes with acylics, and they were hot glued on. Also, note the lint roller in the background of this picture. The hair gets /everywhere/.


-----

Here's another picture of the rabbit as I kept adding the fur and coloring it. The ears were attached at this point. They look a bit fat, which is why I should have just skipped the clay and only used wire. You can see the uncolored fur on the face, which had to be trimmed a lot.


-----

After attaching all the fur, I colored it. I colored it a bit as I glued it, just so I wouldn't get bored cutting and hot gluing. In retrospect I could have saved some paint by gluing and trimming all the faux fur before coloring it. This only took one paint pen, but it was basically completely gone when I finished. In this stage, it wasn't glued to the plaque yet, I was just seeing how it looked. It also needs whiskers and I have to color in the nose.


-----

This is a picture of the finished product. At this point I had already put it up in my house to surprise my family, so I had to climb up to get a picture. You can see the whiskers and the painted nose/mouth in this photo. The whiskers were made with some kind of clear thin plastic string that I bought at a hardware store, and the nose was painted with acrylics. The whiskers were just hot glued and then stuck into the fur on the nose.


-----

That's it! Since this one was relatively easy, especially compared to the FlowerFace one, I have already ordered more rabbit forms to make other neon rabbits. One day I might have an army of them to sell.